
 There is nothing more discouraging than to open your closet or dresser drawer and realize that there is no room for the clothes you’ve just washed! You try hard to shove the clothes into the drawer but you damage the drawer instead. What do you do?
Most people, at this point, lose their temper and dump the whole drawer on the floor vowing to throw it all out. But there’s no need to lose your temper or throw all your clothes away. The solution is relatively simple.
Obviously, you need to clean out your closet and drawers… but there is a strategy for doing it efficiently without causing too much stress in your life. There is also a strategy for if you plan on donating your goods or selling them. No matter what you do, you need to decide right from the beginning what course of action you plan on doing BEFORE you get started.
I’m not an expert, but I’ve been cleaning out closets and drawers my whole life. I have been a military child and then wife since the day I was born… and if there is one thing people in the military must do, that is to purge.
Following you will find fail safe ways to accomplish your task of making way for your new or washed clothes without stress …
Donating Clothes:
Donating Clothes is perhaps the fastest way to get rid of unwanted clothing and items found in closets and drawers. One thing to keep in mind is just because you don’t want  an item any longer, doesn’t mean it is donation worthy. The items you donate should be in good condition with no major damage to them. Missing buttons, holes in jeans are acceptable, but stained items or undergarments should be thrown out.
Let’s get started!
- First rule of thumb, don’t plan on cleaning out all your drawers and closet in one fail swoop. You will complete this task over the course of a week.
- What to get rid of is important!
- Get rid of anything in season that you haven’t worn in the last three weeks.
- Get rid of anything that you don’t fit. Hanging on to clothes that are too small is a waste of time and space. Only when you lose weight should you go out and CELEBRATE by buying yourself new clothes. But the reality is, most people spend at least a year pushing their too small clothes back and forth in their closet before finally getting rid of them.
- Get rid of clothes that are CLEARLY out of style. If you are holding onto your high school jeans, put them in the attic…not your closet/drawers!
- Start with a drawer that is out of season. If it is summer, start with the sweater drawer. It is easier to purge when you aren’t worrying about wearing the items in this drawer that week. You’ll have a clearer eye as to what looks fresh, what looks dated, and whether you just want to start with something new next season.
- Place a medium sized garbage bag or crate next to your dresser for discarded items.

(Using large bags can rip or burst if filled too full) For items too soiled/ripped or just not worthy of donating… walk right to your trash and throw them out! - Go through the first drawer JUST TO GET YOURSELF STARTED! Place discarded items into the bag/crate. Straighten the clothes left in the drawer.
- Next, go to your clothes closet. If your clothes are sorted, start again with those items out of season OR that you don’t wear often.
- If they are NOT sorted, start with the LAST 10 items in your closet. Most likely they are at the back because you don’t wear them much.
- Look through 10 items only. ASK YOURSELF:
- When was the last time I wore this?
- Does this still fit?
- Do I even like this?
If you must THINK about keeping the item, GET RID OF IT!!!! You are only keeping things you really like and love wearing!!
- NOW STOP!No point in wearing yourself out on the first day!

- SECOND DAY: Chose your time of day, either before you go to work or after, when you are changing clothes
- As you pull your clothes out for the day or for after work, go through the drawer you opened first. Quickly race through the drawer discarding any items that immediately you know you don’t want. (Place them in the bag/crate.) Leave any items that you aren’t sure about for later.
- Head to the closet for your shoes/belt/purse or whatever. WHATEVER it is you are going for, look through 10 of those items and purge anything that is a “no brainer purge item.” Don’t waste your time thinking about “maybe items.”
- Go to work/school… or wherever you are going after work. YOU ARE DONE FOR THE DAY
- Third Day- To End: Repeat the above pattern until you have made it once through everydrawer and at least half your closet.
- When your crate gets full, empty the contents into a bag or box for donation. Then move them to your trunk of your car… out of the house and out of your way.
- Once you have made it through the drawers and most of the closet, take the bag/boxed items to the nearest non-profit donation center. There are many out there and they are all easy to use. There are even donation dumpsters that you can stop by on the way to work and dump your items in without speaking to anyone.
- NOTE: IF YOU NEED OR WANT A TAX DEDUCTION FOR YOUR ITEMS, YOU
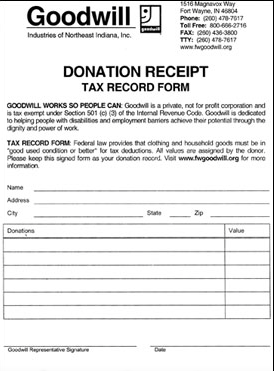
MUST GO TO A CENTER WHERE THEY HANDWRITE A RECEIPT. I highly recommend this if you are donating a large amount. A medium to large size bag can have up to $500 worth of items in it. Make certain you note what you donated in case you should ever be audited by the IRS. - Now take a break from purging for at least a week. Once you are rested and are ready to finish your project, start where you left off. Before you know it, you will be done and ready for the last step.
- Last Step: Straighten your drawers. I recommend you do this on a Saturday or Sunday when you have a little more time. Turn on your tunes and begin…
- You might have been straightening your drawers as you went. But now is the time to go one last time through both your drawers and closet, looking one last time at those “maybe items.” It’s a great time to purge them because you are in the “purge mood.” Once you finish this, place your donated items in your car and as you head out to enjoy your weekend, make your first stop the donation center.
- DO NOT LEAVE YOUR DONATION ITEMS IN YOUR CAR FOR MORE THAN ONE WEEK!!! We are not turning your car into your closet!

SELLING YOUR CLOTHES:
- Selling your clothes is not a new concept. More and more people are finding their clothes are worth big money. But a word of caution, selling your clothes can be time consuming and you must do a little research before you begin.
- The difference between selling your items versus donating them is you must be more discerning when separating your clothing. Not all clothing is worth selling and you need to know which should be donated, trashed and kept for selling.
THE PLAN:
- Begin by deciding if you are going to take your items to a Consignment Shop, a Buy Back store like Plato’s Closet or the Buffalo Exchange, or sell on line.
- Understand that you are not going to get top dollar for your items, but determine what you hope to get for each item so that you can chose the right venue for selling them.

- FOLLOW THE SAME PLAN AS ABOVE EXCEPT PLACE TWO CRATES/BAGS NEXT TO YOUR DRESSER.
- I recommend that you use two different colors so that you can discern which are the selling items and which are the donation items.
- When your bag/boxes are full for your “to be sold items” Place these items aside in another area in your home until you are ready to begin selling. NOTE: This should not take more than a few weeks. The idea is to get the items out of your home as quickly as possible.
- Make certain that you still throw away items immediately and take your donated items to the centers as directed above.
- Once you have removed all donated items and trashed items from your home. It is time for you to begin dealing with your “for sale” items.
- Prepare your items for Sale
- Make certain that each item is clean and worthy of selling
- If you are selling to a Buy Back Store, fold all items and sort them by type of clothing. Bag/Box them and take them to the store as soon as possible. It is suggested that you take these items to the store during the week when the store is not as busy.
- IF you are selling the items to a Consignment Shop or on line, begin by labeling each item with a sticky note so you know how much you want for them.
- Then in crates or boxes, take your items to the Consignment Shop. Be careful when signing a contract, as many shops will take ownership of your goods after a set period of time. So, make sure you clarify if you will be back to pick up any unsold clothes.
- On Line posting: Most people wanting to sell on line know how to do this or
 they would not be taking on this endeavor. But there are many friendly sites out there now that are a simple click and post and your item is sold soon thereafter. But there is an art to it!
 - Make certain that your photos of items have good lighting for posting. There should only be one item per photo/and posting. Make sure that the size/scale is good and that the consumer can clearly see what they are buying.
- Make sure also, that you have a plan for shipping and the transfer of money. Never give any of your personal information out to customers! It is best to make new emails/websites etc. that deal only with the sale of your clothes.
- Make a deadline for when you want the clothes sold… otherwise you should have just left them in your closet and drawers. If they don’t sell, donate them after three weeks. There are lots of people who would be happy to have your old favorite dress or shirt for free.
Now you know how to purge your drawers and closets with no stress and efficiency. You don’t have to stop once you’ve handled the clothes… these strategies work well for all closets, garages, kid’s bedrooms and even the kitchen! Have fun and Good Luck!
Photos courtesy of Google images; archivesjasonline.com; goodwill


